Why We Moved from Vuforia to AR Foundation
We’ve used Vuforia in previous projects, and it has served us well. However, our application was specifically designed for iPad, and most of the functionality we needed was already available through ARKit.
Moving to AR Foundation offered several advantages.
Native ARKit integration
AR Foundation integrates with Apple’s ARKit through Unity’s ARKit XR Plugin. This gives us direct access to native image tracking, world tracking, and anchor management through Unity’s XR APIs.
Fewer dependencies
Keeping our AR functionality within Unity’s XR ecosystem reduced the number of third-party systems we needed to maintain and simplified our project structure.
More control over content placement
Our previous Vuforia implementation kept models parented to their image targets. As the tracking system continuously updated the marker’s estimated position, the models could shift slightly.
We wanted the marker to establish the model’s initial position without controlling it afterwards. AR Foundation’s anchor system provided a straightforward way to separate image detection from content placement.
This behaviour isn’t exclusive to AR Foundation, but switching gave us an opportunity to improve our implementation.
Session anchors instead of an image parent
The useful part of the switch was ARAnchor, not image tracking by itself. ARKit image tracking tells you where the printed marker is. An anchor is a pose in the device’s world map. Once the model is parented to that anchor, ARKit keeps it in the room while the user walks around it, including after the marker is covered or leaves the camera.
Parenting the model to the tracked image makes the print the coordinate system for the whole session. Every correction to the marker moves the model. An anchor splits those jobs: the image is only the placement event, and world tracking holds the model afterwards. That is what lets us wait for a stable pose, call ARAnchorManager.TryAddAnchorAsync, and then ignore later image updates.
These anchors last for the AR session. They are not a saved map, and they are not shared between devices. That was enough for a training piece that is placed, used, and then closed.
Improved performance in our tests
After migrating our existing scenes, we noticed smoother tracking and visibly improved frame rates on the iPad.
This wasn’t a controlled benchmark, and performance will vary depending on the application and device, but the improvement was noticeable in our project.
Overall, AR Foundation gave us the functionality we needed, with more direct control over the AR experience.
1. Setting Up AR Foundation
For this project, we used:
- Unity 6
- AR Foundation 6.0.7
- Apple ARKit XR Plugin 6.0.7
- Universal Render Pipeline (URP)
Start by installing AR Foundation and Apple ARKit XR Plugin through Unity’s Package Manager. Enable ARKit under XR Plug-in Management for iOS.
Next, configure the scene:
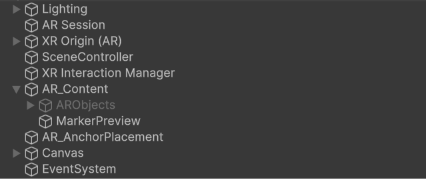
- Create an XR Origin (Mobile AR) and ensure an AR Session is present.
- Add an AR Tracked Image Manager and AR Anchor Manager to the XR Origin.
- Create an XR Reference Image Library.
- Add your marker image and specify its physical dimensions in metres.
- Enable Keep Texture at Runtime in the library for our preview script.
- Assign the library to the AR Tracked Image Manager.
We’ll use Target_Image as the reference image name throughout this example.