Creating Synthetic Data Using Unity

What is Synthetic Data?

Synthetic data is a result of artificially manufacturing any sort of data – whether it be images, texts, or audio – algorithmically, rather than generating the data type by real world events. These data sets are used as a stand-in for testing production or operational data, to further corroborate mathematical models against the behaviour of the real world data and, with increasing rise in implementation, to train machine learning models. 

Datasets can be fully or partially synthetically generated. An image consisting of a 3D model of a car driving through a 3D environment would be considered as entirely artificial, while a 3D model of a car placed in a photograph of a location would be a partially synthetic counterpart.

Advantages and disadvantages

The main advantages to using synthetic data instead of real world data is that it is more cost effective, can be private, and can be tested efficiently. This can be applied to the auto-mobile space especially, where it can be both time consuming and costly to collect real world data. 

Synthetic data can be generated by extracting away any personal information from the real dataset – such as names, license plates, and location – so as to render it completely anonymised. All personal data has been removed and the information cannot be traced back to the original source, avoiding any possibility of copyright infringement.
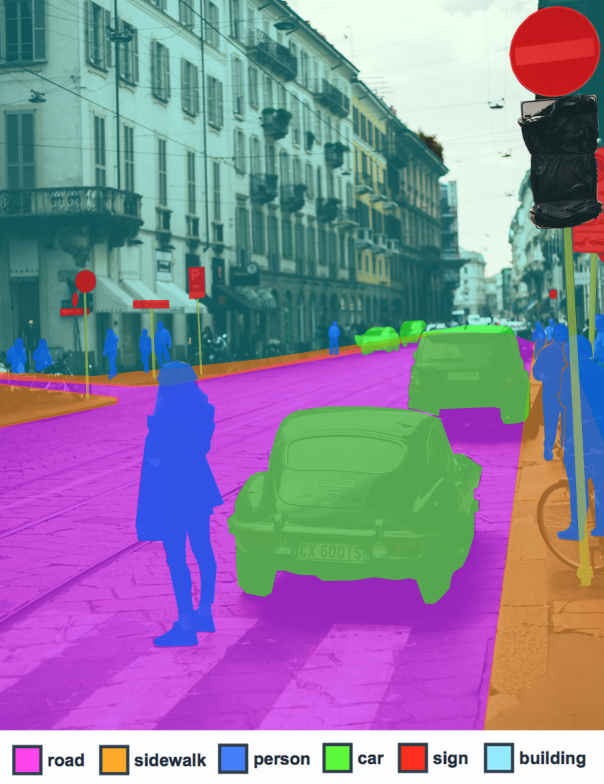
A Street with Different Objects Highlighted in Different Colours

The healthcare and financial services are the two main industries that benefit from synthetic data procedures. These procedures can be used to manufacture data with similar features to real world regulated or sensitive data. 

For example, healthcare data professionals are then allowed to use and share data more freely by using synthetic data, and still maintain patient confidentiality. In the financial sector, synthetic datasets such as credit and debit card information that look and act like typical transaction data can help in exposing fraudulent activity.  

This does not come without its limitations, however, as synthetic data can simulate many attributes of authentic data but it does not simulate the original content exactly. Mathematical models look for common biases in the original data when creating synthetic datasets, but may not cover the corner cases that the authentic data did. Though in some cases this may not be a critical issue, this may severely limit the capabilities of the model and negatively impact the accuracy of the output.

These models can be excellent at recognising statistical regularities in datasets but they can also be susceptible to statistical noise. Adversarial perturbations can cause the model to completely misclassify data and in turn, create highly inconsistent outputs.

Image Synthesis with Unity3D

It is difficult to get away from the need for high-quality labeled data when training mathematical models. There are instances where these datasets are freely available, but in other instances where it is difficult to get enough labeled data it is easier to engineer these images using a 3D engine.

The Unreal Engine and Unity are game engines which power some of the most popular games released respectively. This means they are perfectly suited for quickly generating numerous synthetic images for training purposes. 

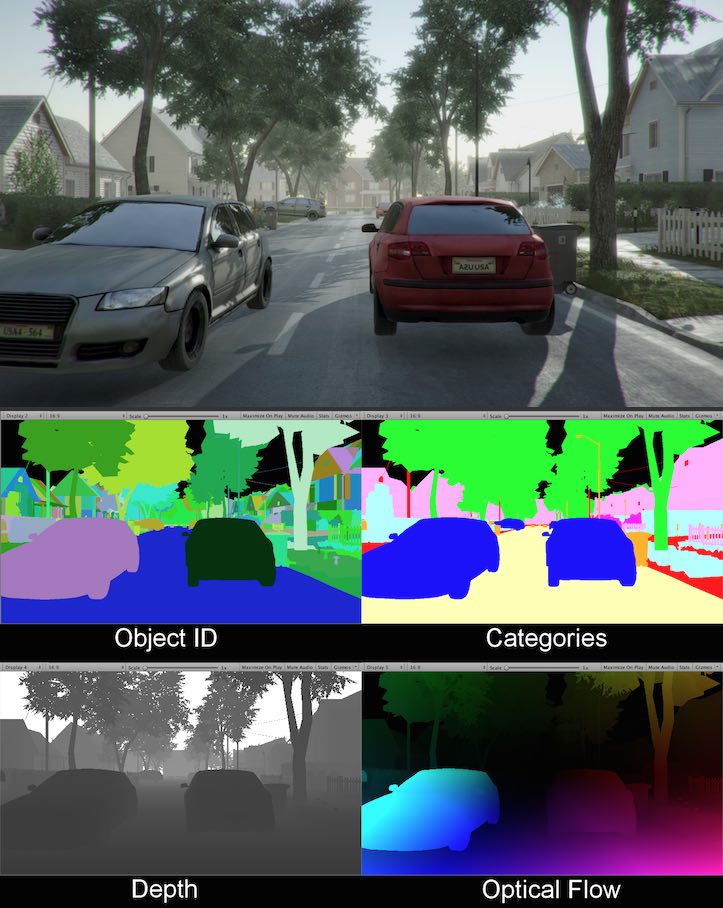
Focusing on Unity, they have provided an open source package (https://bitbucket.org/Unity-Technologies/ml-imagesynthesis) which is the perfect starting point for building synthetic image generators. It consists of a simulated driving environment, that automatically extracts different annotations from each frame of the scene to be saved to disk.

image of 2 cars in a street repeated in different colours and gradients

Setting up the Scene

Firstly, download the Image Synthesis repository from Unity, as linked previously, and open the folder in the Unity engine.

When the project is loaded, there will be an Examples and ImageSynthesis folder available to browse through. This is where Unity presents what is possible with the given scripts, but this may not be enough for most.

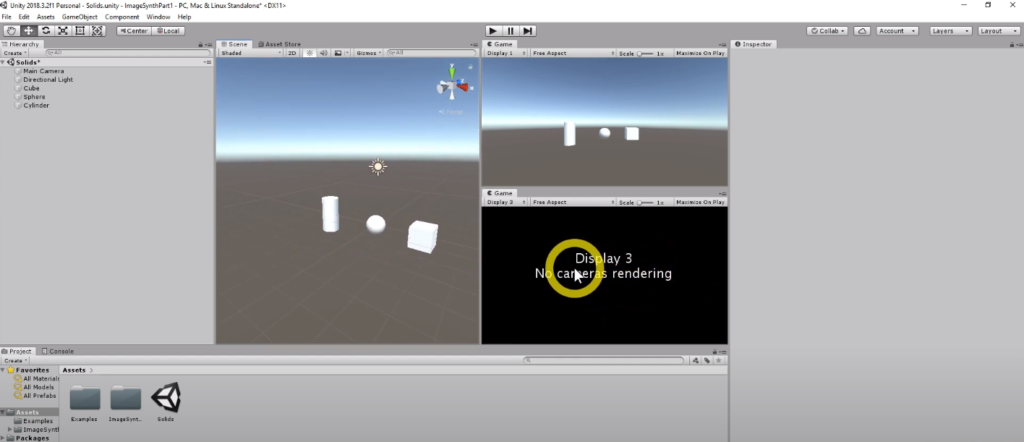
What we can do is create a number of training examples using the primitive shapes that are available in Unity’s engine by creating a new scene.

unity screenshot with VR geometry

Image Synthesis Display

It is possibly clear by now that the secondary game display screen does not seem to be rendering anything out when the scene is played. This is because the display is listening for the image synthesis script to instruct on what to display. 

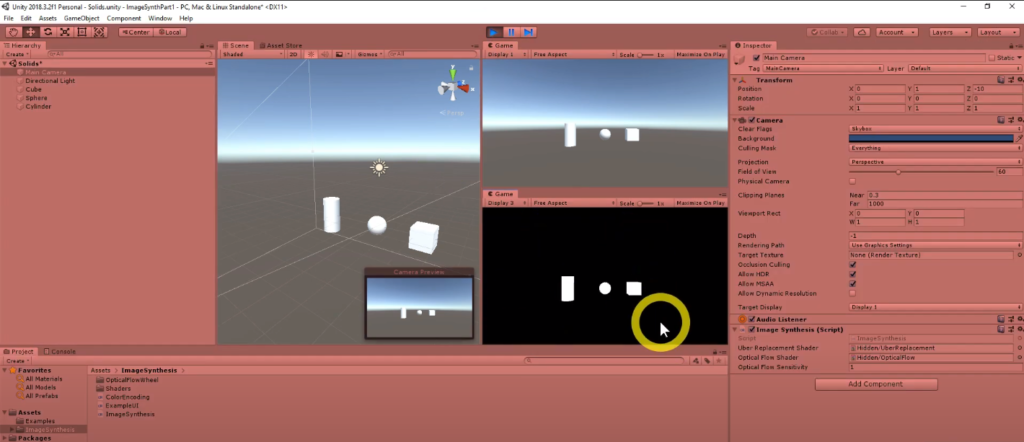
Navigate to the ImageSynthesis folder to find the ImageSynthesis script there. This script will need to be attached to the Main Camera object in the scene. Click on the Main Camera object to bring up it’s properties in the Inspector window, and add the ImageSynthesis script to it.

This can be done by either dragging the script onto the Main Camera object itself, or clicking the Add Component button in the Inspector window for the Main Camera and selecting the aforementioned script. 

Now when the scene is played, with the script attached, the secondary Game display will show the game objects that are populating the scene.

unity screenshot with VR geometry

Labeling Objects

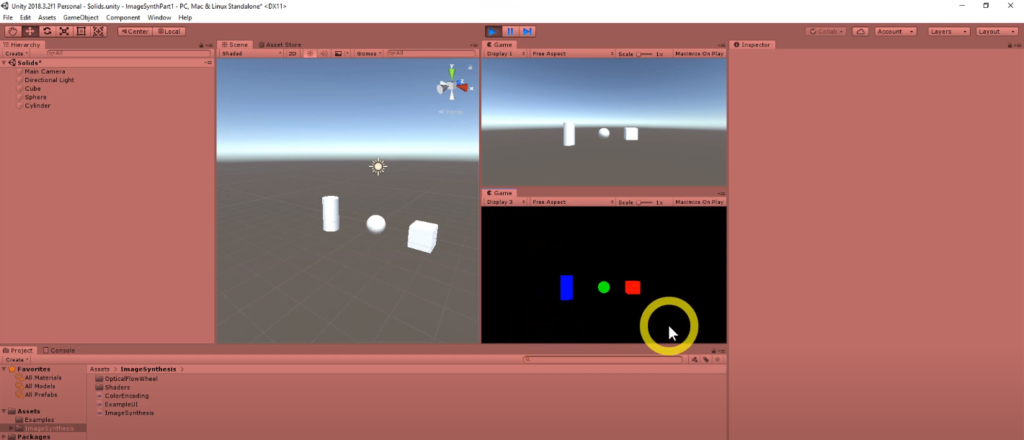
Although the scene is populated with objects that can now be viewed in the different view ports due to the ImageSynthesis script, the objects are all appearing white in colour because they have not been labeled appropriately.

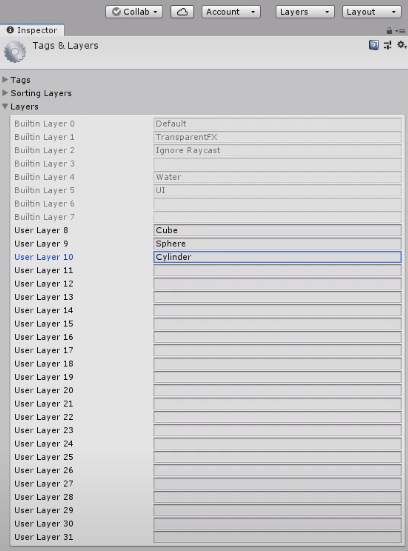
Create some new layering titles by clicking on the Layers dropdown menu, and Edit Layers option. Add a new layer title for each category type to associate with each object that will be populating the scene.

unity screenshot

Now, each object in the scene can be allocated a Layer to be labelled with. This will allow the ImageSynthesis script to find the labels in the scene when it is played and assign each object a color according to the category it falls into.

unity screenshot with VR geometry

Updating the ImageSynthesis

The great thing about this process so far is that these labeled objects can be converted into prefabs to be used as part of a pool of objects and instantiated into the scene when needed. The problem with this is that the ImageSynthesis script will not recognise the objects that are instantiated after the start method is called.

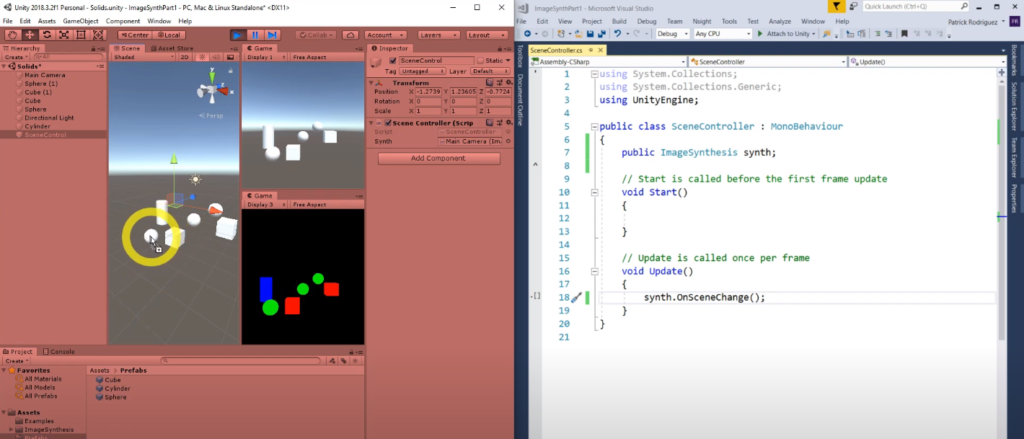
The ImageSynthesis can be notified with frame if a new object is introduced into the scene by creating a new script, which can be called SceneManager or SceneController. This script will need a reference to the ImageSynthesis script, which is found on the Main Camera object in the scene.

In the Update function for the SceneController script, the ImageSynthesis reference will give access to the OnSceneChange() function. Now, while the scene is playing and a new object is introduced, the ImageSynthesis script will read the category label for the object and assign its intended colour.

screenshot of VR space and geometry with coding page

Randomise Object Instantiation

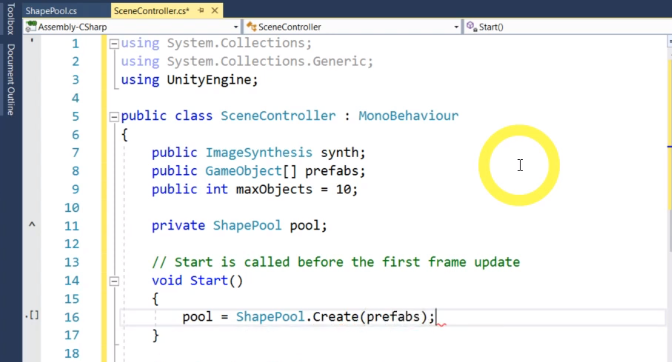
To effectively populate the scene with objects at random, the SceneController script will need to be modified to instantiate a list of objects as soon as the scene is played.

Beneath the reference to the ImageSynthesis variable, add an array of GameObjects called prefabs. This will hold the references to the prefabs of the objects that were created earlier.

Create an integer variable called maxObjects and set it to 10. This is to keep track of the number of objects that are to be instantiated into the scene. As otherwise, the scene might be overwhelmed with an infinite number of objects and crash.

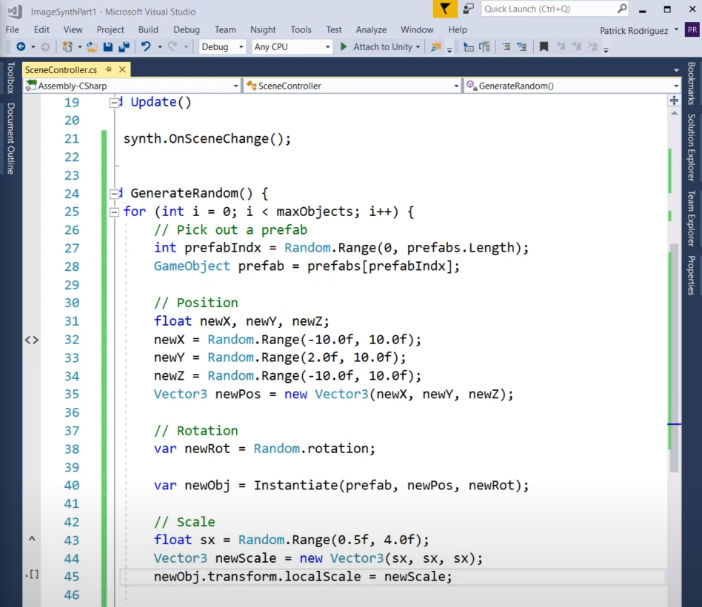
Create a method called GenerateRandom that consists of a for loop. The for loop will run for the integer value that was set for the variable maxObjects, which in this case is set to 10.

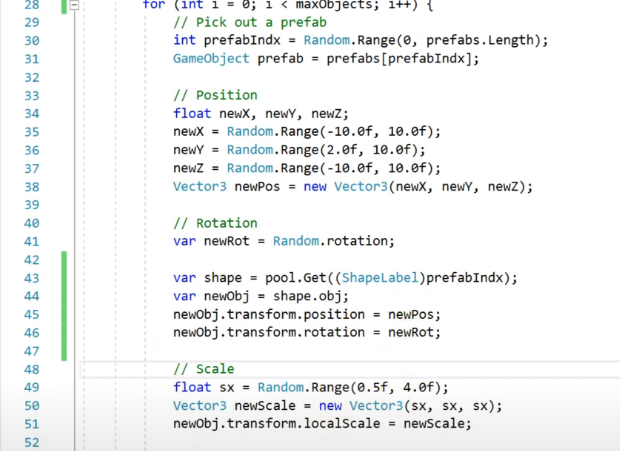
For each iteration of the for loop, the GenerateRandom method will pick out a prefab from the array of objects that has been declared, and subsequently set a new position, rotation and scale for the newly instantiated object.

screenshot of a coding page

So far, the SceneController script is set up to generate 10 objects from an array in random locations, rotations and scales once. To generate and also delete objects every frame for training purposes the script will need to be developed further.

Firstly, create an array of GameObjects called created, and in the Start method set the variable to a new GameObject with the size of the previously mentioned maxObjects integer.

Now, within the GenerateRandom method a new for loop is needed before the previous loop to instantiate the objects, except this new loop will run for the length of the created array, checking to make sure that the objects in the array are not null before destroying the object.

Moving down to the instantiating for loop, after an object has been instantiated, add the object into the created array. With all that set, moving the GenerateRandom method call from the Start method into the Update will show the results of the SceneController script, so far. Which is a number of objects being randomly generated and destroyed each frame.

Object Pooling

The issue with this setup is that the objects that are being instantiated are not being destroyed nearly as quickly by Unity’s garbage collector, resulting in memory leaks in the program. Especially when dealing with numerous synthetic images. 

One clever way of dealing with this problem in Unity is called object pooling. This is where objects that are needed at any specific point in time are pre-instantiated before gameplay. For instance, objects may be pooled during a loading screen and instead of creating new objects and destroying old ones during gameplay, the same objects are reused.

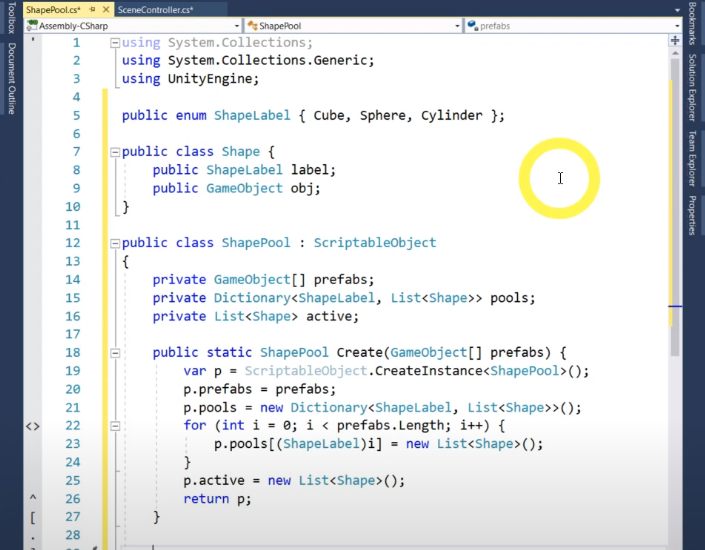
To get started on pooling objects, create a new script called ShapePool, and make it derive from ScriptableObject not MonoBehaviour. Then create an enum and call it ShapeLabel, as this is going to hold references to the object labels that were created earlier. Create a new Shape class that will package the ShapeLabel and a GameObject.

Back in the ShapePool class, a declaration for an array of GameObjects prefabs is needed, as well as a List of active Shape objects, and a Dictionary of these and their ShapeLabels. 

To continue on with the ShapePool class, ScriptableObjects cannot use constructors directly, but a static initialiser can be used instead to create instances of the ShapePool objects.

screenshot of a coding page

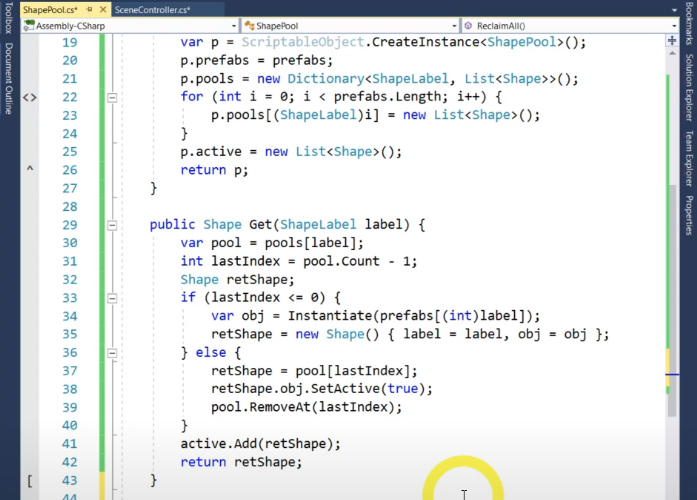
The crux of this ShapePool class is the Get method, that will create a new object and add a new object of the same type to its pool, or look through the pool for an object type and return that object instead.

screenshot of a coding page

What is needed to complete the ShapePool class is a way to recall the active objects back into the pool by creating a ReclaimAll method.

screenshot of a coding page

With that in place, the SceneController will need to be updated to incorporate the ShapePool class. Now the created array can be replaced with a reference to the ShapePool class, and the declaration in the Start method can be changed to reflect this change.

screenshot of a coding page using unity 12

The GenerateRandom method will also be changed, as the first for loop can be replaced by the ShapePool ReclaimAll method call. Within the second for loop, instead of manually instantiating a new gameobject, the ShapePool Get method will be called, casting the prefabIndex as a ShapeLabel. Now this new pool object can be positioned, rotated and scaled.

screenshot a coding page

Saving Images to Disk

The Unity project, when run, now generates a number of objects to the scene and replaces them every frame, but still needs to be able to save these frames to disk. This is a simple enough process, as the ImageSynthesis script comes with a method to develop these frames as a png file.

In the Update method of the SceneController script, the ImageSynthesis reference can be called to get the Save method in the script. This method takes in a: string, two integers, and another string; to take in a; file name, the height and width of the image, and the folder path respectively.

For example, this can be written out as: synth.Save(fileName, 512, 512, “synthImages”);

Where fileName is a variable that can be incremented each frame, so as not to overwrite a previous image.

The result of running the project now will be a folder that contains numerous training images that were synthetically manufactured, and can be used with the fastai library for instance to train an image segmentation network that will be able to recognise a number of different 3D model objects.

Hey! I am first heading line feel free to change me

Would you like to know more about how the generation of synthetic data via Unity or Unreal game engines can help your business? Please feel free to drop us a line at info@sbanimation.com

Recent Posts